Поширені питання щодо передачі передачі
-
Який процес передачі?
Це процес, який дозволяє вам, як інсталятору, передати права власності кінцевому користувачу. Будь ласка, переконайтеся, що всі монтажі завершені перед передачею. Якщо передача не завершена, сповіщення буде видно у верхньому правому куті сторінки.
Що означає повна інсталятура?
Повна інсталяція означає повне налаштування всіх пристроїв KNX у будівлі — включаючи проводку, налаштування та тестування — щоб система була готова керувати такими функціями, як освітлення, жалюзі, опалення та інше.
Вона включає:
А. Встановлення та підключення всіх пристроїв KNX
Б. Налаштування їх у ETS або Easy. Ви можете створити новий проєкт Easy tool, імпортувати проєкт ETS або відновити резервне копіювання.
В. Переконайтеся, що додані додаткові пристрої, якщо такі (не Hager, IoT), і всі вимірювання, автоматизації та сценарії налаштовані відповідно до потреби.
Г. За потреби ви можете додати додаткових користувачів. У domovea є можливість додавати обмежених і референтних користувачів.
Д. Тестування всіх функцій працює правильно.
Е. Підготовка документації та передача її кінцевому користувачу.
Будь ласка, переконайтеся, що у вас є електронна адреса кінцевого користувача перед передачею
Рисунок 1: Ініціювання передачі
-
Що таке акаунт myHager?
Обліковий запис myHager дозволяє отримувати доступ до віддалених/хмарних функцій через інфраструктуру Hager, що дозволяє Hager Pilot і серверу domovea спілкуватися, коли ви не в локальній мережі.
myHager працює з Hager Pilot, що дозволяє візуалізувати та керувати кількома серверами domovea для різних клієнтів з одного інтерфейсу. Це допомагає контролювати встановлення, перевіряти стан системи та проводити технічне обслуговування або усунення несправностей дистанційно, без необхідності відвідувати кожен об'єкт.
-
Чи потрібен мені акаунт myHager для завершення процесу передачі?
Так, процес передачі вимагає автентифікації через обліковий запис myHager. Система автоматично перевірить, чи є прив'язаний акаунт myHager.
Якщо обліковий запис myHager не виявлено, у вас є два варіанти:
А. Система перенаправить вас на сторінку акаунта myHager, де ви зможете увійти зі свого існуючого акаунта myHager
Б. Створіть новий акаунт myHager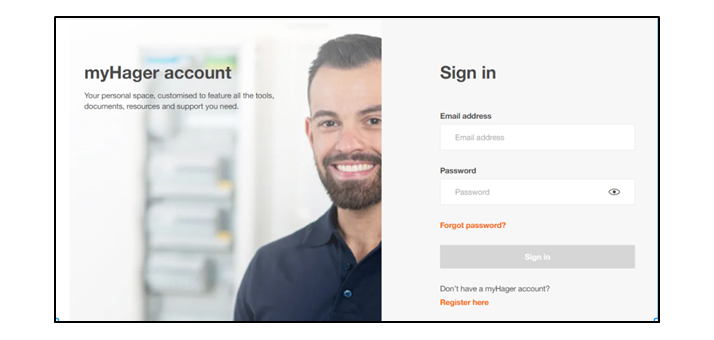
Рисунок 2: Увійти до акаунта myHager
-
Як створити обліковий запис myHager?
Створити акаунт myHager просто. Вам потрібно натиснути на «Зареєструватися тут», і вас перенаправить на сторінку реєстрації. Після реєстрації ви отримаєте підтвердження на обрану вами електронну адресу.

Рисунок 3: Створення нового акаунта myHager
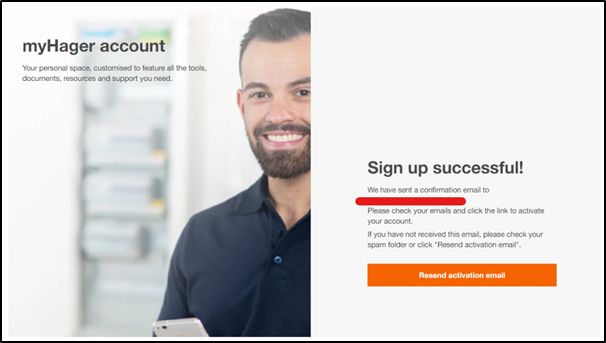
Рисунок 4: Успішна сторінка реєстрації

Рисунок 5: Активація акаунта myHager
Після активації акаунта ви можете увійти у свій акаунт myHager і завершити процес передачі.
-
Що мені робити, якщо у мене вже є існуючий акаунт myHager?
Якщо у вас вже є існуючий акаунт myHager, потрібно просто увійти за допомогою своїх облікових даних myHager.
-
Під час процесу передачі я зрозумів, що пов'язаний акаунт myHager не є правильним, і мені потрібно змінитися, як це зробити?
Щоб змінити пов'язаний акаунт myHager, просто натисніть «Змінити акаунт». Вас перенаправлять на сторінку входу в myHager, де ви зможете легко увійти за допомогою своїх облікових даних.
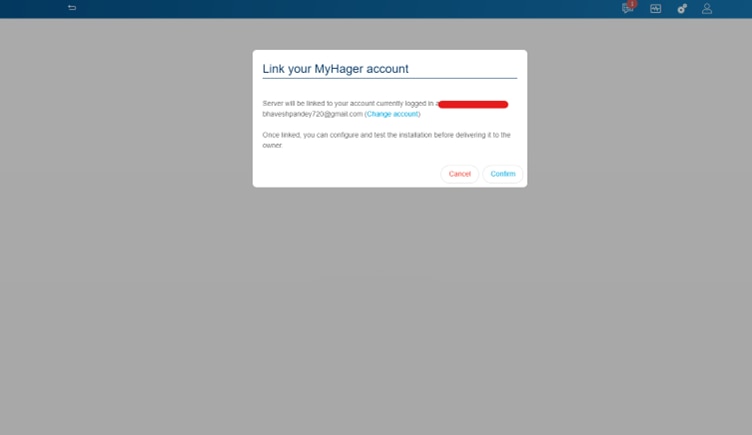
Рисунок 6: Натисніть на Змінити акаунт
Що означає передати установку власнику або собі?
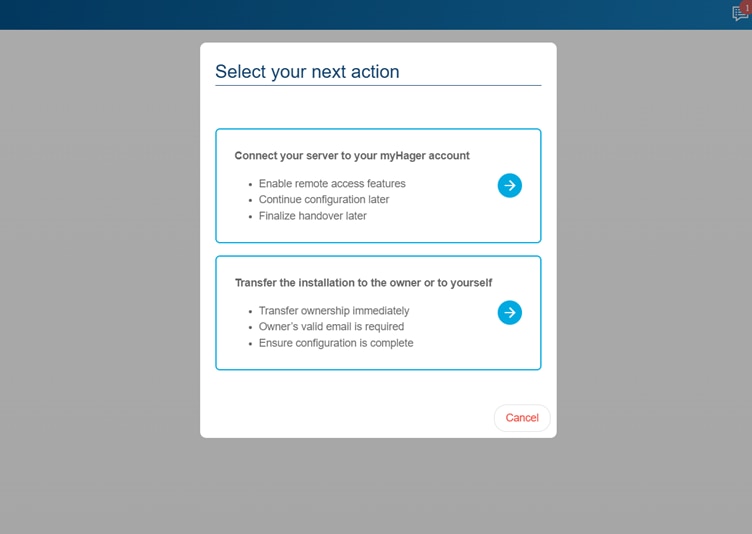
Рисунок 7: Виберіть наступну діюПісля початку передачі вас попросять «Вибрати наступну дію». Ви можете обрати з наступного:
А. Підключення вашого сервера до акаунта myHager
Це дозволяє підключити/прив'язати сервер до існуючого акаунта myHager або створити новий. Прив'язування вашого myHager дозволяє вам:
- Увімкнути функції віддаленого доступу
- Продовжуйте конфігурацію пізніше
- Завершити передачу пізніше, запросивши кінцевого користувача з меню керування користувачем
- Надає вам права монтажника: Дозволяє запросити власника
Б. Передача встановлення власнику або вам самому
Це дозволяє передати встановлення власнику або собі
Передача встановлення власнику:
Щоб передати встановлення власнику, потрібно ввести електронну адресу власника.
Зверніть увагу: права на доступ до встановлення відкликаються у вас (інсталятора) і передаються кінцевому користувачу, щойно власник бере контроль над встановленням
Це означає, що ви не можете отримати доступ до інсталяції віддалено через Hager Pilot, підключившись до свого акаунта myHager. Щоб отримати доступ до інсталяції, потрібно попросити власника повернути вам права з розділу «Налаштування» > «Інсталятор» у додатку domovea.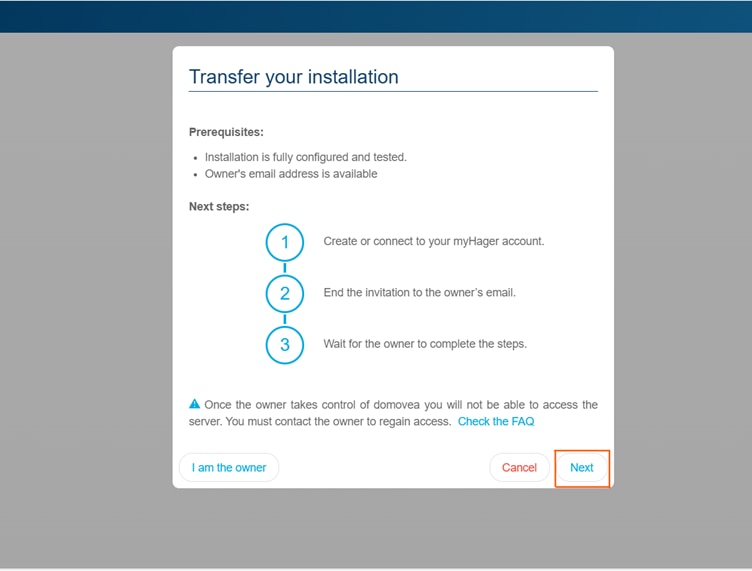
Рисунок 8: Передати встановлення власнику
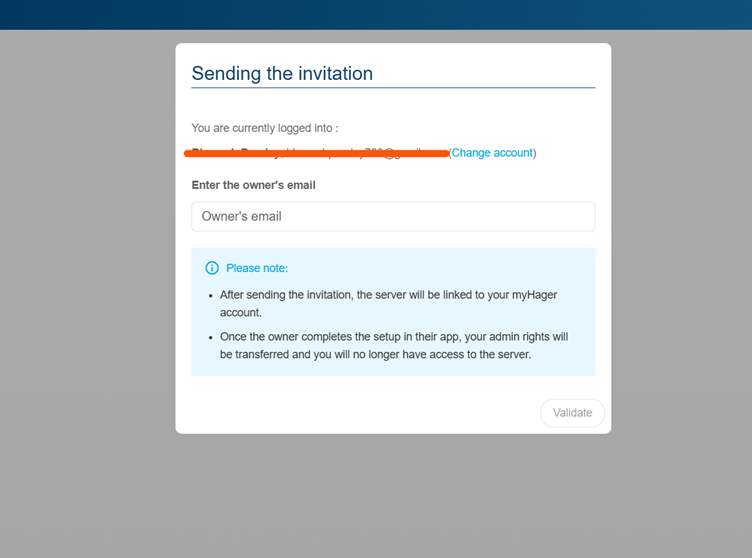
Рисунок 9: Надсилаю запрошення власнику
Коли «ти — власник»
Адміністративні права будуть передані вам. Це означає:
- Ви можете отримати доступ до сервера
- Ви можете увійти в додаток domovea з тими ж обліковими даними
- Ви можете додати кілька ролей користувачів: інсталятор, референтний користувач і обмежений користувач
- Ви будете діяти як адміністратор і власник. Це означає, що права адміністратора будуть передані вам, тобто ви зможете отримати доступ до сервера з акаунтом myHager з відповідними обліковими даними
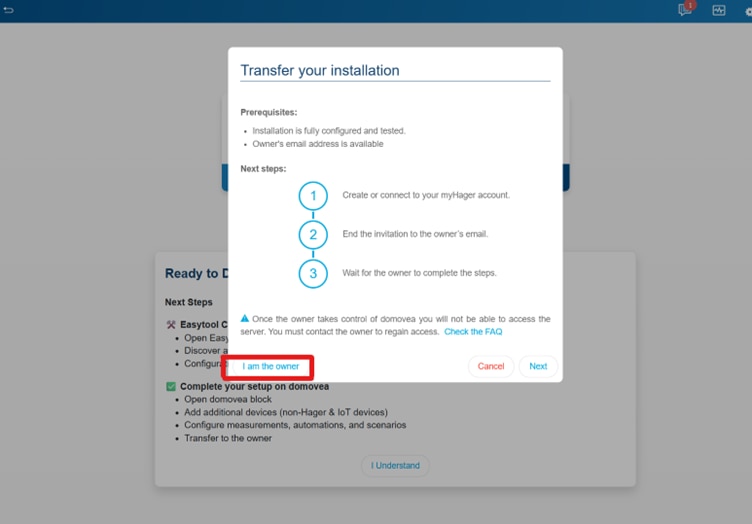
Рисунок 10: Вибір 'Я — власник'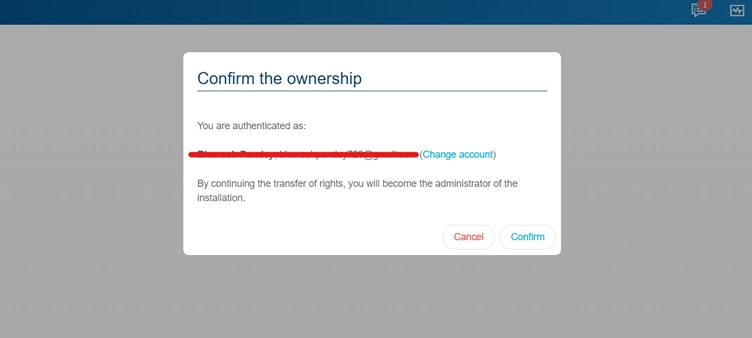
Рисунок 11: Підтвердити право власності -
Як мені дізнатися, що передача завершена?
Коли «я власник»
Як тільки ви обираєте право власності «Я є власником», передача завершується, і права адміністратора будуть передані відповідному email ID.
Коли обирається «Я запрошую власника»:
Передача завершується після того, як власник приймає запрошення та входить у інсталяцію.

Рисунок 12: Запрошення надіслано власнику
-
Що станеться, якщо я введу неправильну електронну адресу кінцевого користувача під час процесу передачі?
Можливо ввести неправильну електронну пошту кінцевого користувача, але не хвилюйтеся — ви можете це виправити. У такій ситуації:
- Запрошення буде надіслано на небажану електронну адресу
Як перевірити введену електронну пошту?
- Перейдіть до розділу «Налаштування», який позначається іконкою шестерні у верхньому правому куті екрана
- Натисніть на неї. З'явиться випадаюче меню. Виберіть користувачів
- Ви можете побачити введений лист. Лист позначений як власник
Рисунок 13: Підтвердження листа
Що можна зробити?
У цьому випадку ви можете просто «скасувати» запрошення- Перейдіть до розділу користувачів, доступного з розділу «Налаштування»
- Переконайтеся, що введена електронна адреса не відповідає бажаній
- Натисніть кнопку «Скасувати» у розділі запрошеньЩоб надіслати нове запрошення:
- У тому ж вікні – натисніть «Запросити власника»
- Введіть дані власника з правильною електронною адресою
- Натисніть на «Запросити власника»
Нове запрошення буде надіслано на електронну адресу
Рисунок 14: Скасувати запрошення
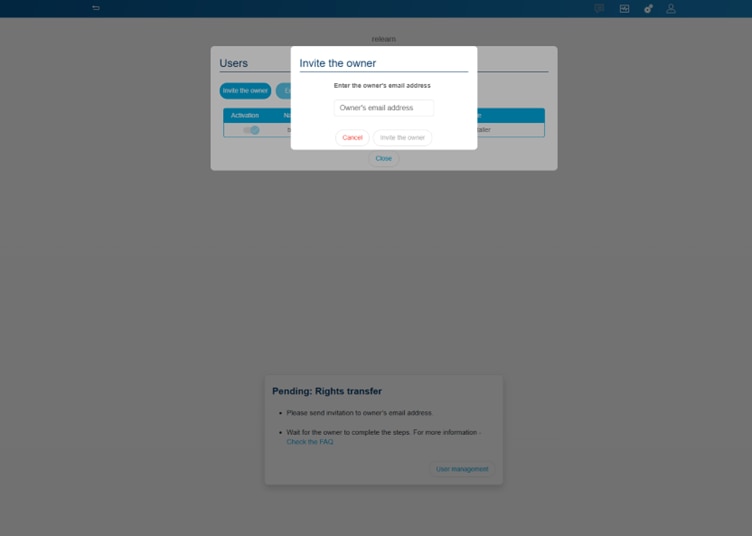
Рисунок 15: Запросити власника
-
Що таке функція скидання користувача і як вона використовується?
Ця функція дозволяє вам, як інсталятору, скинути всіх користувачів і почати передачу з нуля. Лише встановлення буде збережено. Усі персональні дані будуть видалені. Ця функціональність може бути корисною, коли:
- Власника будинку чи квартири потрібно змінити
- Знову робити передачу з будь-якої причини
- Змініть налаштування передачі власності — з «Я є власником» на «Запросіть власника»
Нижче наведено кроки, які можна виконати для виконання скидання користувача.
- Перейдіть до розділу «Налаштування», який позначається іконкою шестерні у верхньому правому куті екрана
- Перейти до управління системою
- Виберіть «Скидання користувачів»
Рисунок 16: Виберіть скидання користувача
- Ви отримаєте підказку, де зможете обрати між видаленням «Референтних» і «Обмежених користувачів» або їх збереженням.
Рисунок 17: Підтвердити скидання користувача
- Зробіть свій вибір і оберіть «Підтвердити»
Ваша установка тепер скинута. Ви можете знову розпочати процес передачі з новим власником. -
Що таке референтні та обмежені користувачі і як їх створити?
У domova є різні ролі користувачів із певними рівнями доступу
Референтний користувач:
- Це довірений користувач, якому адміністратор і інсталятор можуть надати доступ до конкретних пристроїв, груп і послідовностей
- Референтний користувач такий самий, як і будь-який користувач у domovea, але не має жодного посилання на myHager cloud.
- Референтний користувач має доступ до конфігурації дверних телефонів (дійсно лише для довідок – TJA470 та TJA510)
- Щоб отримати доступ до інсталяції через додаток domovea як референтний користувач, вам не потрібно мати обліковий запис myHager
- Референтний користувач може додати обмеженого користувача
- Створення домограм можливе з застосування domova
Як увійти як референтний користувач?
Після додавання референтного користувача з розділу налаштувань користувач може просто отримати доступ до інсталяції за наданою електронною поштою та паролем.
Адміністратор і інсталятор можуть керувати правами доступу (групи, пристрої, послідовності) для референтного користувача з розділу прав користувача
Примітка: Будь ласка, пам'ятайте пароль, який був створений під час додавання референтного користувача, оскільки він буде потрібен для входу
Рисунок 18: Управління правами користувачів для референтного користувача
Обмежений користувач:
Обмежений користувач — це користувач, який має доступ до додатку domovea і не може отримати доступ або редагувати інсталяцію
- Обмежений користувач не має доступу до конфігурації doorcom (що дійсно для посилань TJA470 та TJA510)
- Обмежений користувач не має права доступу до конфігуратора і, відповідно, не може редагувати інсталяцію
- Щоб отримати доступ до встановлення через додаток domovea як обмежений користувач, вам не потрібно мати обліковий запис myHager
- Створення домограм можливе з застосування domova
Рисунок 19: Додавання обмеженого користувача
Як увійти як обмежений користувач?
Після додавання обмеженого користувача з розділу налаштувань користувач може просто отримати доступ до інсталяції за наданою електронною поштою та паролем. Адміністратор і інсталятор можуть керувати правами доступу (групи, пристрої, послідовності) для референтного користувача з розділу прав користувача
Примітка: Будь ласка, пам'ятайте пароль, який був створений під час додавання обмеженого користувача, оскільки він буде потрібен для входу
Після завершення передачі можна створити та керувати додатковими обліковими записами:
- Натисніть на налаштування (шестерні)
- Перейдіть до користувачів і виберіть Нові
- Після додавання додаткового акаунта перейдіть на domovea і увійдіть, опцію «додати новий сервер вручну». Якщо ви не в локальній мережі, будь ласка, оберіть серійний номер сервера, який можна знайти:
o Налаштування > Конфігурація > Віддалений доступ
Рисунок 20: Додаю нового користувача

Рисунок 21: Вибір типу користувача

Рисунок 22: Доступ до вашої місцевої установки
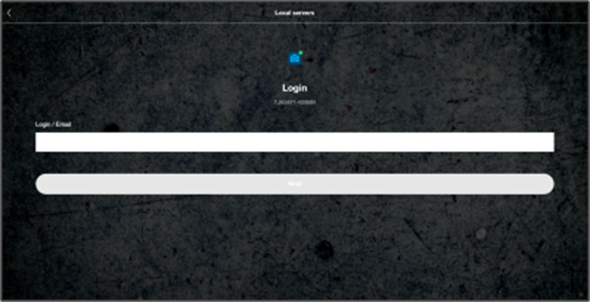
Рисунок 23: Додавання облікових даних — референтний або обмежений користувач
-
Що означає резервне копіювання завантаження?
Завдяки функції завантаження резервного копіювання domovea дозволяє отримати резервну копію вашої інсталяції. Це не обов'язково, але настійно рекомендується зробити резервну копію вашої установки.
Примітка: вам буде запропоновано зашифрувати резервну копію паролем. Будь ласка, обов'язково запам'ятайте цей пароль.

Рисунок 24: Завантажити резервну копію

Рисунок 25: Налаштування пароля для резервного копіювання
-
Які наступні кроки після того, як запрошення буде надіслано кінцевому користувачу?
Кінцевий користувач повинен отримати електронного листа з кодом запрошення. Цей код дозволить кінцевому користувачу використовувати додаток domovea для керування своїм розумним будинком.
Запрошення на електронну пошту виглядатиме приблизно так:

Рисунок 26: Шаблон електронного листа для запрошення
Кінцевому користувачу достатньо натиснути «відкрити domovea».
- Якщо у вас немає встановленого додатку domovea – вас буде перенаправлено до магазину додатків для завантаження
- Якщо додаток domovea вже встановлений — вас все одно перенаправлять до магазину додатків. Тут ви можете просто відкрити додаток
Зверніть увагу:
- Deep Link працюватиме лише зі смартфонами та планшетами
- Будь ласка, перевірте папку зі спамом на наявність листа-запрошення
У додатку domovea користувачу буде запропоновано обрати між двома варіантами:- Увійти за допомогою акаунта myHager:
o Оскільки це перший раз, коли користувач отримає доступ до інсталяції, ймовірність висока, що потрібно створити обліковий запис myHager
o Після створення акаунта користувачу достатньо увійти
o Після завершення входу користувачу буде показано, що є одне запрошення на очікування
o Натискання на очікуване запрошення дозволить користувачу отримати доступ до інсталяції
o Вам не доведеться повторювати процес, якщо ви вийдете з акаунта. Система автоматично виявить вашу установку
- Прийміть запрошення:
o Оскільки це перший раз, коли користувач отримає доступ до інсталяції, ймовірність висока, що потрібно створити обліковий запис myHager
o Після створення акаунта користувачу достатньо увійти
o Після завершення входу користувачу буде запрошено ввести отриманий код запрошення для доступу до інсталяції. Користувачу достатньо скопіювати/вставити код із отриманого запрошення.
o Вам не доведеться повторювати процес, якщо ви вийдете з акаунта. Система автоматично визначить вашу інсталяцію.
Рисунок 27: екран входу
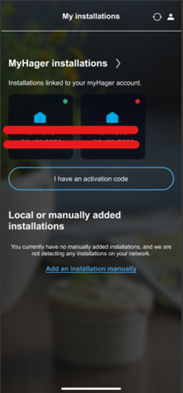
Рисунок 28: після входу : встановлення пов'язано з myHager
-
У чому різниця між локальною установкою та встановленням myHager?
Локальна інсталяція:
Локальне встановлення означає установку, яка знаходиться у вашій локальній мережі
- Працює лише тоді, коли ваш телефон/планшет і ПК підключені до тієї ж мережі, що й ваш сервер Domovea
- Хмарні сервіси не залученіІнсталяція myHager:
- myHager Platform — це хмарна платформа Hager. Коли ви підключаєте свою установку до нього, сервер Domovea підключається до хмари, дозволяючи віддалений доступ, оновлення та управління вашою системою розумного дому через захищені онлайн-сервіси Hager.
- Простіше для оновлень/резервного копіювання та віддаленої діагностики
Рисунок 29: myHager та локальна інсталяція
-
Як я можу додати сервер вручну?
Сервер можна додати вручну:
- Натисніть «Додати інсталяцію вручну»
- Відкриється нова сторінка, яка дозволить додати сервер. Існує кілька способів додати сервер
o IP – Функціональний лише тоді, коли ваш смартфон або комп'ютер підключені до тієї ж локальної мережі, що й сервер domovea
o Серійний номер
o Сканування UUID (розташований у нижньому лівому куті TJAS471 та TJAS671)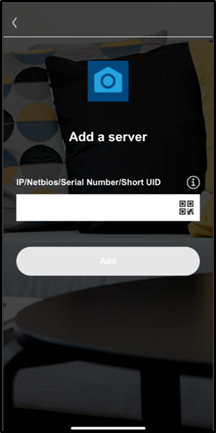
Рисунок 30: Додавання сервера вручну
-
Які права доступу інсталятора після завершення передачі?
Під час налаштування інсталятор має повні права на налаштування та зміну інсталяції. Після завершення передачі ці права передаються кінцевому користувачу.
Інсталятор більше не має доступу до віддаленого перегляду, редагування чи зміни інсталяції. Будь-які зміни конфігурації, усунення несправностей або оновлення можливі лише за умови, що користувач явно надасть доступ назад до інсталятора.
Це гарантує, що повний контроль матиме лише власник системи після завершення встановлення.Що можна зробити, якщо я, як інсталятор, хочу мати доступ до встановлення після передачі?
Це можливо. У такому випадку користувач повинен надати вам доступ до інсталяції. Це можна зробити у розділі Налаштування додатку domovea. Щоб перейти до розділу налаштувань
- Відкрити додаток domovea
- Перейдіть у меню бургерів і відкрийте Налаштування
- Перейдіть до доступу до інсталятора і ввімкніть кнопку «Активний доступ інсталятора»
Рисунок 31: надає права доступу інсталятору
Зверніть увагу: Будь ласка, не забудьте деактивувати доступ до інсталятора після завершення встановлення.