Handover FAQ
-
What is the handover process?
It is a process which allows you as an installer to transfer the ownership rights to the end user. Please ensure that all installation is complete before doing the handover. When a handover is not done, a notification will be visible on top right of the page.
What does a complete installation mean?
A complete installation means a complete setup of all KNX devices in a building — including wiring, configuration, and testing — so that the system is ready to control functions like lighting, shutters, heating, and more.
It includes:
1. Installing and wiring all KNX devices
2. Configuring them in ETS or Easy tool. You can create a new Easy tool project, import an ETS project or restore a backup project.
3. Make sure additional devices are added if any (non-Hager, IOT) and all measurements, automations & scenarios are setup as desired.
4. If required, you can add additional users. In domovea you have possibility to add restricted and referent users.
5. Testing all functions work correctly.
6. Preparing documentation and handing it over to the end user.
Please ensure that you have email address of end user ready before doing handover
Figure 1: Initiating the handover
-
What is myHager account?
myHager account allows you to access remote/cloud features via Hager’s infrastructure, enabling the Hager Pilot and domovea server to communicate when you're not on the local network.
myHager works with the Hager Pilot, allowing to visualize and manage multiple domovea servers for different customers from a single interface. This helps to monitor installations, check system status, and perform maintenance or troubleshooting remotely, without needing to visit each site. -
Do I need a myHager account to complete the handover process?
Yes, the handover process requires authentication with myHager account. The system will automatically check if there is a linked myHager account. If no myHager account is detected, you have two options:1. The system will redirect you to the myHager account page where you can login with your existing myHager account
2. Create a new myHager account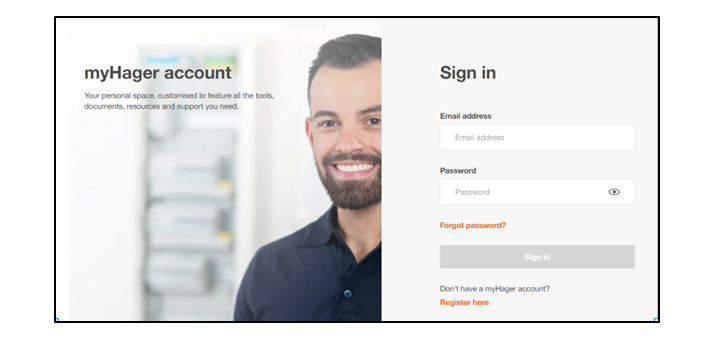
Figure 2: Login to myHager account
-
How do I create a myHager account?
Creating a myHager account is simple. You must click on ‘Register here’ and will be redirected to a sign-up page. Once you sign up, you will receive a confirmation email to your chosen email address.
Figure 3: Creating new myHager account
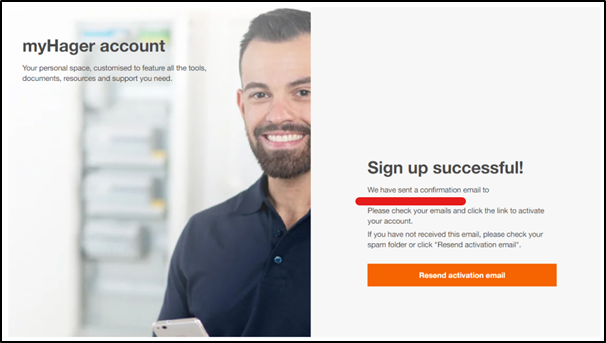
Figure 4: Successful signup page

Figure 5: Activating myHager account
Once the account has been activated you can login with your myHager account and complete the handover process.
-
What do I have to do if I already have an existing myHager account?
If you already have an existing myHager account, you must simply login with your myHager credentials. -
During the handover process, I realise that the associated myHager account is not the correct one and I need to change, how can I do it?
To change the associated myHager account, just click on Change account. You will be redirected to the myHager login page where you can easily login with your account credentials.

Figure 6: Click on Change Account
What does it mean to transfer the installation to the owner or to yourself?

Figure 7: Select your next action
Once you initiate the handover, you will be asked to ‘Select your next action’. You can choose from the following:
1. Connection of your server to myHager account
This allows you to connect/link your server to existing myHager account or to create a new one. Linking your myHager allows you to:
- Enable remote access features
- Continue the configuration at later time
- Finalise the handover later by inviting end user from user management menu
- Give you installer rights: Enables you to invite the owner2. Transfer of installation to owner or to yourself
This allows you to transfer installation to owner or to yourself
Transfer installation to owner:
To transfer installation to the owner you will need to enter the email address of the owner.
Please note: the rights to access the installation are revoked from you (installer) and are transferred to the end user as soon as owner takes control of installation
This means that you cannot access the installation remotely via Hager Pilot by connecting to your myHager account. To access the installation, you need to ask the owner to give you back the rights from Settings > Installer access section on the domovea application.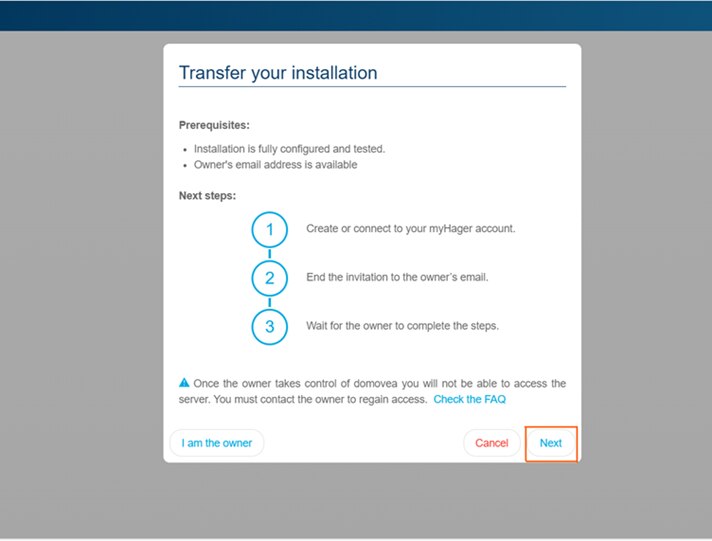
Figure 8: Transfer installation to owner
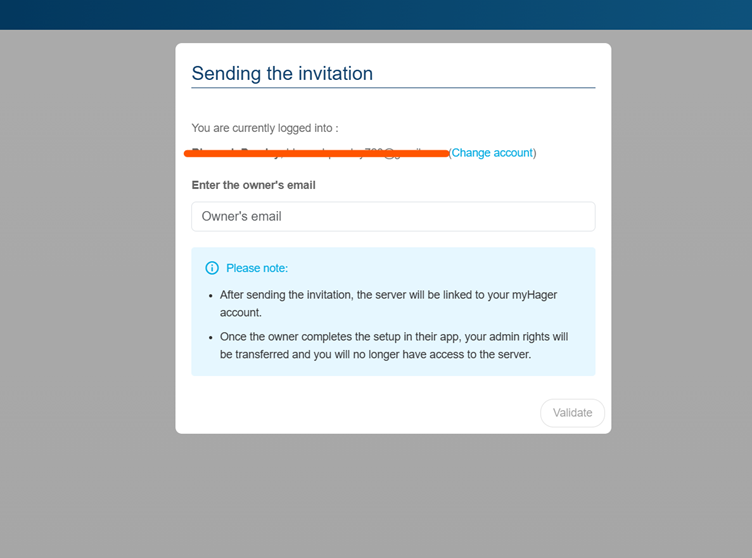
Figure 9: Sending invite to owner
When ‘you are the owner’
The admin rights will be transferred to you. This means:
- You can access the server
- You can login to domovea app with same credentials
- You can add multiple user roles: Installer, referent user & restricted user
- You will act as an admin and as the owner. This means that the administrator rights will be transferred to you i.e. you can access the server with myHager account with related credentials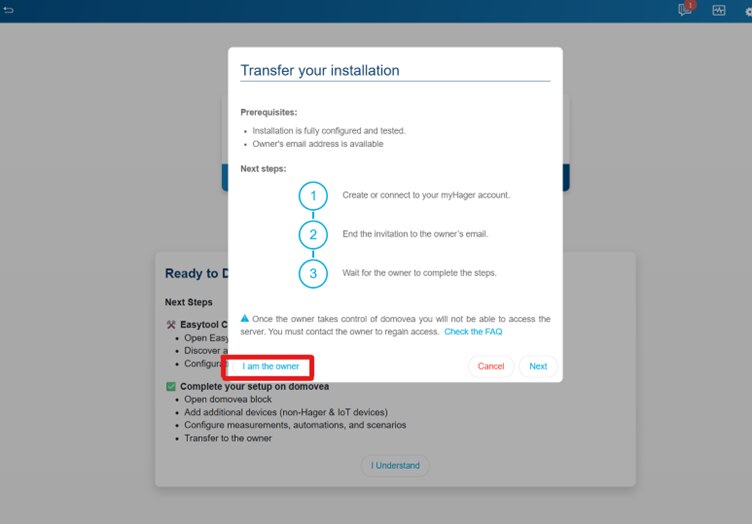
Figure 10: Choosing "I am the owner"
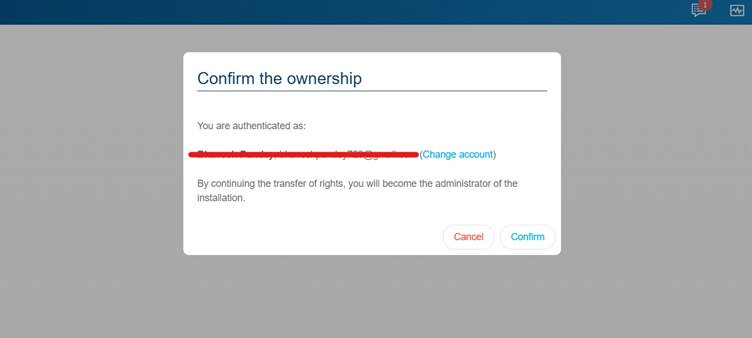
Figure 11: Confirm ownership
-
How do I know that the handover is completed?
When ‘I am the owner’
As soon as you select the ownership right ‘I am the owner’, the handover is completed and the admin rights will be given to associated email id.
When ‘I invite the owner’ is selected:
Handover is completed when the owner accept the invite and login to the installation.
Figure 12:Invitation sent to owner
-
What happens if I enter the wrong email address of the end user during the handover process?
It is possible to enter wrong email of the end user but do not worry, you can fix it. In such situation:
- The invitation email will be sent to an undesired email addressHow to verify the email entered?
- Go to Settings section represented by the gear's icon on top right of the screen
- Click on it. A dropdown menu will appear. Choose Users
- You can see the email entered. The email is marked as an owner
Figure 13: Verifying the email
What can be done?
You can simply ‘Cancel’ the invitation in this case- Navigate to users section accessible from ‘Settings’
- Verify that the email address entered is not the desired one
- Click on ‘Cancel’ button in the invitation section
To send a new invitation:- On the same window – Click on ‘Invite owner’
- Enter the details of the owner with correct email address
- Click on ‘Invite owner’A new invitation will be sent to the email address

Figure 14: Cancel invite

Figure 15: Invite the owner
-
What is user reset functionality and how it is used?
This functionality allows you as an installer to reset all users and start the handover from the scratch. Only the installation will be conserved. All personal data will also be deleted. This functionality can be useful when:
- An owner of a house/apartment needs to be changed
- Doing the handover again for any reason
- Change the handover ownership settings – from ‘I am the owner’ to ‘invite the owner’
Following are the steps which can be taken to perform a user reset.- Go to Settings section represented by the gear's icon on top right of the screen
- Go to system management
- Choose ‘Users reset’
Figure 16: Choose user reset
- You will receive a prompt where you could choose between removing ‘Referent’ and ‘Restricted users’ or keeping them.

Figure 17: Confirm user reset
- Make your choice and choose ‘Confirm’
Your installation is now reset. You can initiate the handover process again with new ownership. -
What are referent and restricted users and how can I create them?
In domovea there are different user roles with specific access levels.
Referent user:
- It is a trusted user to which an administrator and installer can provide access to specific devices, groups and sequences
- The referent user is the same as any user in domovea but does not share any link to myHager cloud
- A referent user has access to doorphone configuration (only valid for references – TJA470 & TJA510)
- To access installation via domovea app as a referent user you do not need to have a myHager account
- A referent user can add a restricted user
- Creation of domograms is possible from domovea applicationHow to login as a referent user?
Once the referent user has been added from the settings section, the user can simply access the installation via provided email and password .
An administrator and installer can manage the access rights (groups, devices, sequences) for the referent user from the user rights section.
Note: Please remember the password which was created while adding the referent user as it will be required to login.

Figure 18: Managing user rights for referent user
Restricted user:
A restricted user is a user which has access to domovea application and cannot access or edit an installation.- A restricted user does not have access to doorcom configuration (valid for TJA470 & TJA510 references)
- Restricted user does not have the right to access the configurator and hence cannot edit the installation
- To access installation via domovea app as a restricted user you do not need to have a myHager account
- Creation of domograms is possible from domovea application
Figure 19: Adding a restricted user
How to login as a restricted user?
Once the restricted user has been added from the settings section, the user can simply access the installation via provided email and password.An administrator and installer can manage the access rights (groups, devices, sequences) for the referent user from the user rights section.
Note: Please remember the password which was created while adding the restricted user as it will be required to login
Once the handover is finished it is possible to create and manage additional accounts:- Click on settings (gears)
- Go to users and select New
- Once the additional account is added, go to domovea and login by ‘adding a new server manually’ option. If you are not in your local network, please select the server serial number which can be found in Settings > Configuration > Remote access
Figure 20: Adding new user

Figure 21: Selecting type of user

Figure 22:Access your local installation
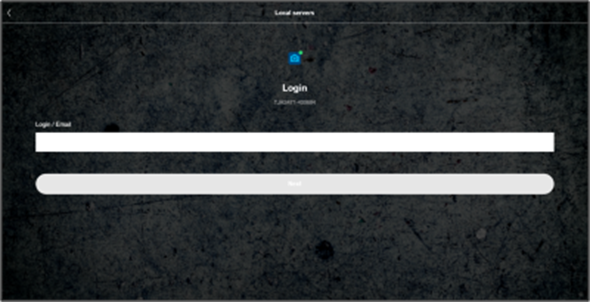
Figure 23: Adding credentials - referent or restricted user
-
What does download backup mean?
By download backup functionality, domovea allows you to have backup of your installation. It is not mandatory but highly advised to make a make a backup of your installation.
Note: You will be prompted to encrypt the backup with a password. Please make sure to remember this password.

Figure 24: Download backup

Figure 25: Setting up password for backup
-
What are the next steps once the invite has been sent to end user?
The end user must have received an email with the invite code. This code will allow the end user to use the domovea app to manage their smart home.
The invitation email will look something like:

Figure 26: Invitation email Template
The end user simply must click on ‘open domovea’.
- If you do not have domovea app installed – you will be redirected to the app store for download
- If domovea app is already installed – you will still be redirected to the app store. Here you can simply open the appPlease note:
- the deep link will only work with smartphones and tablet s
- Please check the spam folder for the invitation email
On the domovea app – user will be prompted to choose between two options:Login with myHager account:
- Since it is the first time the user will access the installation, chances are high, they need to create myHager account
- Once the account is created, user simply needs to login
- Once the login is complete, user will be shown there is one pending invite
- Clicking on the pending invite will allow the user to access the installation
- You will not need to repeat the process if you logout. The system will automatically detect your installation
Figure 27: login screen
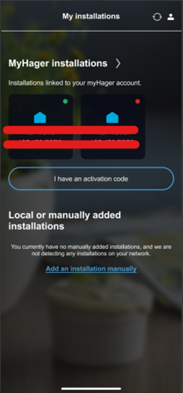
Figure 28: after login : installation linked to myHager
-
What is the difference between local installation and myHager installation?
Local installation:
Local installation means the installation which is present on your local network
- Works only when your phone/tablet and PC are connected to the same network as your domovea server
- No cloud services are involved
myHager installation:
- myHager Platform is Hager’s cloud platform. When you link your installation to it, the Domovea server connects to the cloud, allowing remote access, updates, and management of your smart home system through Hager’s secure online services.
- Easier for updates/backup and remote diagnostics
Figure 29: myHager and local installation
-
How can I add a server manually?
A server can be added manually by:
- Click on ‘Add an installation manually’
- A new page will open which will allow you to add a server. There are multiple ways a server can be added> IP – Only functional when your smartphone or computer is connected to the same local network as the domovea server
> Serial number
> Scanning UUID (present on bottom left of the TJAS471 & TJAS671)
Figure 30: Adding server manually
-
What are installer access rights after handover is completed?
During setup, the installer has full rights to configure and modify the installation. Once the handover is completed, these rights are transferred to the end user.
The installer no longer has access to view, edit, or modify the installation remotely. Any configuration changes, troubleshooting, or updates can only be done if the user explicitly grants access back to the installer.
This ensures that only the system owner has full control after the installation is delivered.
What can be done if I as an installer want to have access to installation after the handover?
It is possible. In such scenario the user has to give access of the installation to you. This can be done from the Settings section of the domovea app. To navigate to the settings section.
- Open domovea application
- Go to burger menu and open Settings
- Go to installer access and toggle the ‘Active installer access’ button
Figure 31 : giving access rights to the installer
Please Note: Please do not forget to deactivate the installer access once the installer has finished the installation.